Author Topic: Athearn U50 Install  (Read 5311 times)

Espeelark

  • Engineer
  • ***
  • Posts: 61
Athearn U50 Install
« on: December 12, 2024, 04:35:47 PM »
I've started an install on an Athearn (Southern Pacific) U50. I'll update this post as I move forward.

After removing the shell, I removed Athearn's stock PC board and all grain-of-wheat light bulbs. I will replace the bulbs with LED's. Note - I use 15 mA or 20 mA LED drivers with the LEDs as opposed to resistors.

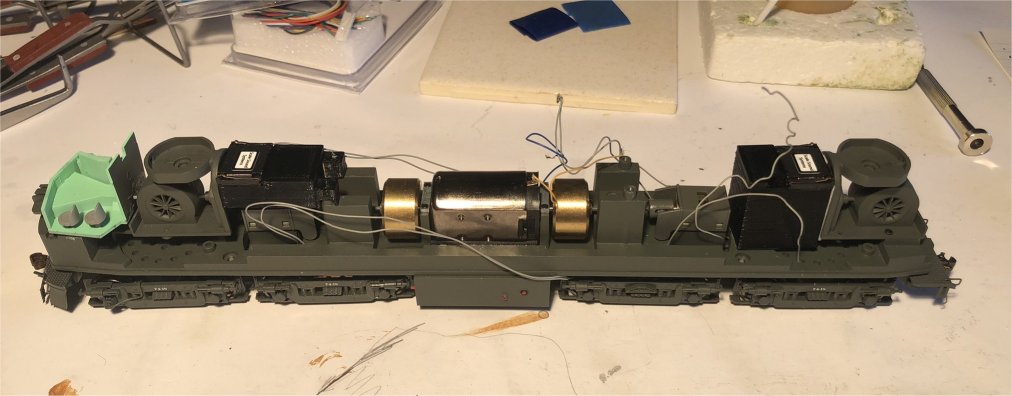
Here's a photo of the stripped down chassis.
U50 01.jpg

There is a grey wire coming from each of the four trucks on each side providing track power, so four wires per side for a total of eight. You can see them sticking up in the above photo.

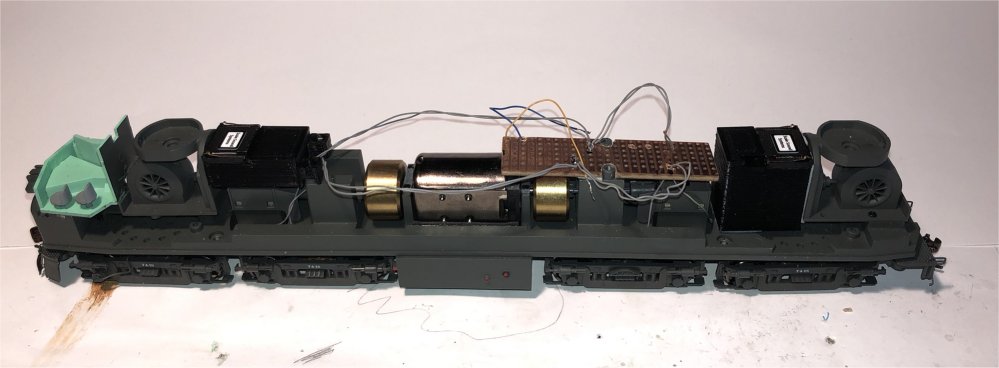
Next, I cut a piece of PCB bread-board to make it simpler to connect all of the wires. In addition to the normal forward/reverse headlights, I'm going to install SP's typical oscillating headlight. Here's  a picture of that PCB board installed. Note that I cut-out a couple notches into it to fit around the screw posts that held the factory PCB.
U50 02.jpg

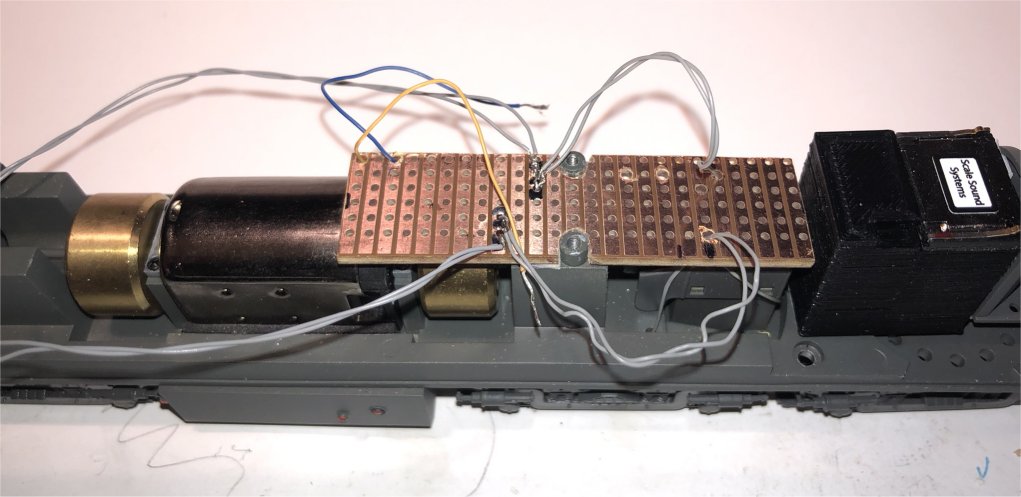
Here's a close-up of the PCB. Here I've soldered the track power leads to separate chases on the PCB. I've separated them by one PCB chase just to help insure no adjacency shorts. I also fed the blue and orange motor wires up through the PCB.
U50 03.jpg

I plan to install the LM-3S just forward of the PCB.
The Scale Sound Systems paired speakers are also installed at this point. One conveniently uses a pair of screw posts that held the original factory PCB. The one in the rear is bigger and sits on the chassis frame with a piece of double-sided tape. I plan to wire these in series.
« Last Edit: December 12, 2024, 04:48:05 PM by Espeelark »
Espeelark (Paul Mac)
Modeling the SP in Ohio
"Bad is never good until worse happens...."

faithie999

  • Conductor
  • ****
  • Posts: 166
Re: Athearn U50 Install
« Reply #1 on: December 12, 2024, 05:24:22 PM »
can you send a link to the LED drivers you use?
why do you prefer that approach vs resistors?

thanks
Ken

Espeelark

  • Engineer
  • ***
  • Posts: 61
Re: Athearn U50 Install
« Reply #2 on: December 12, 2024, 07:08:30 PM »
Hi Ken,
I originally used 20 mA current limiters / LED drivers from Lighthouse LEDs. Here's the link to those:
https://lighthouseleds.com/20ma-led-current-limiter-driver.html

I wanted to tone down the intensity of the LEDs just a skoshe so this time I'm trying 15 mA current limiters / LED drivers from Mouser. Here's the link to those:
https://www.mouser.com/ProductDetail/Diodes-Incorporated/AL5809-15P1-7?qs=9BjnSzo86S8n7L%2F6RAZJmA%3D%3D&countryCode=US&currencyCode=USD

As to "why" I use them, I guess it's because I don't have to worry about determining which size resistor to use. With that said however, a resistor is just fine too because the input voltage will always be the same coming from the LM-3S modules.

Regards,
Espeelark (Paul Mac)
Modeling the SP in Ohio
"Bad is never good until worse happens...."

gregeusa

  • Conductor
  • ****
  • Posts: 102
    • Greg's web site
Re: Athearn U50 Install
« Reply #3 on: December 13, 2024, 09:51:20 AM »
What is nice about the limiters, no calculating resistors, and you get a constant current no matter what the supply voltage, nice simplification for installs. Bought about 50 of these years ago... I even have them in surface mounts for my Z scale..
Lots of tips and techniques on my site: www.elmassian.com contact me greg@elmassian.com

faithie999

  • Conductor
  • ****
  • Posts: 166
Re: Athearn U50 Install
« Reply #4 on: December 15, 2024, 05:46:27 PM »
thanks for the info!

Ken

Espeelark

  • Engineer
  • ***
  • Posts: 61
Re: Athearn U50 Install
« Reply #5 on: December 20, 2024, 04:46:36 PM »
Time for an update.
I used 5630/5730 sunny-white LED's from Lighthouse LEDs for this application. They are wide enough to cover both OEM headlight lenses already installed in the shell. Also, before gluing the LEDs in place, I painted the inside of the shell with black paint to help assure no light bleed-through.

Here's the forward headlight and gyralight installed in place. I used canopy glue to glue them into place on the shell itself.
U50 241213 01.jpg

Here is the rear headlight LED.
U50 241213 02.jpg

Here's an overall view of the shell showing the leads for the lights. The leads have 2-pin connnectors on the end so that the shell can be removed from the chassis.
U50 241213 03.jpg
« Last Edit: December 20, 2024, 04:56:02 PM by Espeelark »
Espeelark (Paul Mac)
Modeling the SP in Ohio
"Bad is never good until worse happens...."

Espeelark

  • Engineer
  • ***
  • Posts: 61
Re: Athearn U50 Install
« Reply #6 on: December 20, 2024, 05:06:05 PM »
Continuing with today's update.....

Here are the female pig-tails I made for the lights that will be soldered to the PCB bread-board and stay with the chassis.
U50 241213 05.jpg

This is a general overview after I hard-wired/soldered everything (except for the speaker wires) to the PCB bread-board.
U50 241213 06.jpg

And finally a closer view of the PCB bread-board.
U50 241213 07.jpg

After I get the speaker wires installed, I'll tuck everything into place using some Kapton tape. I'll post more photos when I get there.
« Last Edit: December 20, 2024, 05:08:29 PM by Espeelark »
Espeelark (Paul Mac)
Modeling the SP in Ohio
"Bad is never good until worse happens...."

Espeelark

  • Engineer
  • ***
  • Posts: 61
Re: Athearn U50 Install
« Reply #7 on: December 21, 2024, 05:00:37 PM »
....and the final product.

All lights plugged in and the shell laying on its side.
U50 241221 01.jpg

A closer shot of the PCB bread-board.
U50 241221 02.jpg

Note - when I attempted to install the shell, there is a nose weight whose shape conforms to the rounded nose of the shell. It's a close fit and there wasn't any room for the headlight LED that I glued to the inside of the shell. I masked off the chassis with tape and paper-towels and got out my dremel and carbide grinder and took care of that! After that it was a "simple" matter of making sure all of the wires were tucked up as I put the shell onto the chassis.

Overall very happy with this install!
« Last Edit: December 21, 2024, 05:02:16 PM by Espeelark »
Espeelark (Paul Mac)
Modeling the SP in Ohio
"Bad is never good until worse happens...."