Author Topic: RailPro installation  (Read 4071 times)

Graham54

  • Fireman
  • **
  • Posts: 10
RailPro installation
« on: December 22, 2016, 04:58:29 PM »
Long time since last post, I am in trouble again .   I have acquired two new  locos.  I have managed to install a sound file over the back light button   I no longer have control of back light  I have tried to correct  but there is no file for back or front light.  How do I fix   Problem No. 2   One of the locos is a ATHERN  challenger 4-6-6-2   I have installed LM3S works perfectly.  I wish to install 2 Seuthe No.9 smoke generators.  The factory wiring  appears to come from motor supply at 120 ma each generator  I think the load will be too great for the LM3 plus motor supply is variable not good for the generator.  Do I have to re-hash wiring with supply for smoke  re-directed to track supply with an isolation switch to control smoke Problem 3  I have acquired a Notebook and installed assistant and simulator soft-ware.  Along with a C1-1  how do I utilize  this set-up to load pictures, light and sound to locos ?  This is probably obvious to a computer experienced person I do need detailed instructions  Bloody old and a bit slow !!  Wish all a Merry Xmas and a Happy New Year  I read the Forum daily with expectations of learning more for my hobby.  Graham.

William Brillinger

  • Dispatcher (Admin)
  • Conductor
  • *****
  • Posts: 1327
    • Precision Design Co.
Re: RailPro installation
« Reply #1 on: December 22, 2016, 05:20:24 PM »
Hi Graham, Merry Christmas to you too!

I'll address the question about using the CI-1 for programming.

You need the RP-Sim software ( https://www.ringengineering.net/InstallProgram/RailProHcSimulatorInstaller.exe )
Once the simulator is installed, you can program the simulator the with the sounds and files you want to use just the same way you would with the physical HC.

Once you have your files loaded into the simulator, you can use the simulator to send the files to the LM's as if it were a normal HC. 

I hope this helps!
- Bill Brillinger, RPUG Admin

Modeling the BNML in HO Scale, owner of Precision Design Co., and RailPro Dealer.


Alan

  • Conductor
  • ****
  • Posts: 1073
    • LK&O Railroad
Re: RailPro installation
« Reply #2 on: December 22, 2016, 05:58:27 PM »
Quote
The factory wiring  appears to come from motor supply at 120 ma each generator  I think the load will be too great for the LM3 plus motor supply is variable not good for the generator.  Do I have to re-hash wiring with supply for smoke  re-directed to track supply with an isolation switch to control smoke

I'll take a shot at question 2... If my memory serves correctly the maximum load on any one LM3S lighting pin is 150mA. If you want to be certain not to load the module too heavily you could install a micro relay between the module and smoke generator. Reed relays such as this one are very small and easy to fit inside a loco.

http://www.mouser.com/ProductDetail/MEDER-electronic-Standex/DIP15-2A72-21L/?qs=sGAEpiMZZMtGt%252bn33CgIP26TxSCAonyqWRmebFI4e2M%3d
Alan

LK&O Railroad website

When I was a kid... no wait, I still do that. HO, 28x32, double deck, 1969, RailPro

nodcc4me

  • Conductor
  • ****
  • Posts: 688
  • RailPro Fan
Re: RailPro installation
« Reply #3 on: December 22, 2016, 08:54:54 PM »
For problem 1, I don't think there is a way for you to restore the back light function. I would suggest you email Tim Ring. He may be able to have you download a special file to restore the backlight. If not, you may have to send it in to have the module reset to factory specs.
Al

Run your train, not your brain. Get RailPro. It's a no-brainer.

KPack

  • Conductor
  • ****
  • Posts: 773
Re: RailPro installation
« Reply #4 on: December 22, 2016, 11:23:07 PM »
Problem #1: Let me see if I'm understanding this right...on the rear light function button you somehow changed the "on/off" to a sound file?  I'm not sure how that can happen because the files that shows up in the list of possible ones depends on what type of function button you select.  See below (this is an old revision so the buttons are in a different spot, but the names are the same):


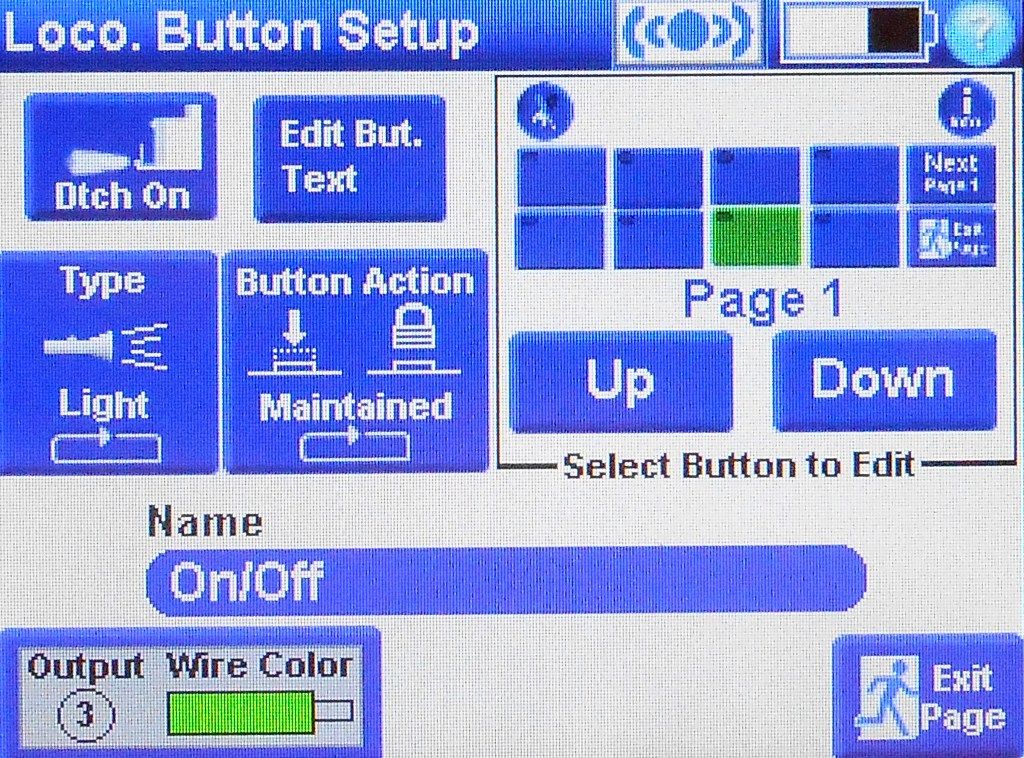
If you tell the rear light button to be a "sound" button (button type) then only sound files will show up when you tap on the "name" field.  If you tell the rear light button to be a "light" type button, then only light files will show up in the "name" list.  The "on/off" file is what you need for the front and rear headlights.  It is installed on every locomotive module.  It can't be written over, but it can be deleted.  However, the only way to delete it would be to purposefully delete manually.  I don't think you did that.

Make sure the button type is "light" and not "sound".  Once it is selected as "light" you will find the "on/off" file found under the "name" list.

-Kevin

Graham54

  • Fireman
  • **
  • Posts: 10
Re: RailPro installation
« Reply #5 on: December 23, 2016, 03:55:10 PM »
Bill I have all that is required.  My computer skills are very basic.  I had a go this morning with some success.  Tried to down-load  a sound for bell chandler and it stopped at 45% and wouldn't advance.  what is the best way to get out when this happens ?  I will try again.                KPack  I have done all the right  processes except select yellow wire colour .  Such a simple thing.       Allan  To use a relay I still need supply of 14 volts 260 ma.  With the control wire from tender.  The 6 wire plug is fully occupied an extra wire difficult and messy.  I have received smoke generators and tested.  At 14.2 volts Railpro  track supply the generator smokes very quickly and with more smoke than I desire.  Supply of about 12-13 volts would be nice.  Is this possible ?  Thanks to everyone who replied.  Hopefully I am back on track.  Graham.

Alan

  • Conductor
  • ****
  • Posts: 1073
    • LK&O Railroad
Re: RailPro installation
« Reply #6 on: December 23, 2016, 05:32:39 PM »
Quote
Supply of about 12-13 volts would be nice.

There are many ways to achieve this each solution with its own strengths and weaknesses. The simplest approach would be a voltage divider network. Exactly the same as an old style train power pack except in miniature.

511ac8f5ce395f5846000000.png

The problem with this solution is the power dissipated by the potentiometer. It would require a somewhat bulky unit that will make heat as a byproduct. If you have the space available then this solution is very simple and inexpensive. I could work out the value for you if need be.

A better way is to use an adjustable voltage regulator such as a LM317. With the addition of a few discrete components you have a fully adjustable voltage regulator that isn't wasteful with power. Its small size and non-critical component placement means you can layout the physical circuit in any manner needed to make it fit inside a loco. Total cost to build is less than $5.

http://www.hobbytronics.co.uk/datasheets/LM317.pdf

The ideal solution would be a DC to DC buck converter. These circuits are a bit much for the non-electronics hobbyist to design and build themselves but fortunately they are abundant on eBay for cheap. They are sold as speed controllers. Here is an example: http://www.ebay.com/itm/DC-5V-6V-12V-18v-24v-2A-Motor-Pump-Speed-Controller-Regulator-Module-Board-/191843783571?hash=item2caac7d393:g:Eu4AAOSwJQdXBiD3. This particular unit measures 48mm x 23mm x 14mm (2" x 1" x 1/2"). If you have space to mount it this would be an ideal solution giving you plug-n-play full adjustability and at your smoke generator load of 200mA there would be virtually no heat produced by the circuit. And at only $1.82 with free shipping how can you beat that!!!

Alan

LK&O Railroad website

When I was a kid... no wait, I still do that. HO, 28x32, double deck, 1969, RailPro