Author Topic: INSTALLING LM-3S in PROTO 2-000  (Read 32937 times)

Tom

  • Engineer
  • ***
  • Posts: 79
INSTALLING LM-3S in PROTO 2-000
« on: January 10, 2021, 09:58:38 AM »
I am just getting started at installing LMs into locomotives (steam seemed better to start with because of ample room in tenders) after having them installed for me.  I started with one Proto 2000 Berkshire which went well, except that the lights blew out.  That got fixed by buying 12V bulbs (incandescent I believe) which did not need resisters.

I am now faced with something a little more complicated and would like some insight if anyone is willing to provide it.  The problem is a Proto 2000 with something called QSI Quantum System, which I had not seen before.  The cleaver thing about it is that one can run it on DC and do about all the things that can be done using DCC – whistle, bells and more.

The problems (see picture attached):

1)  I would like to preserve the original wiring connections so as to allow easy reinstallation of the original decoder.  And more importantly, it will also make it much less likely that I will ruin the whole thing.  This means I need two 2 pin, one 4 pin and one 8 pin receptacles with wires protruding.  I have seen something on internet called JST-2 which looks like it might work, but do not know for sure.  Are there 2, 4 and 8 pin receptacles that can be attached from which to run the wires to an LM-3S?

2)  If you look at the picture there are 13 wires that need to be attached to an LM-3S.  The photo attached identifies all the wires.  I understand how the 2 going to the speakers will attach, but that leaves 11 wires to attach to a 9 pin LM-3S.  Which 2 are not needed, or where do they get attached to the LM-3S, the 6 pin side?
3)  The locomotive has a MARS light.  There is one white wire and two yellow wires going to the locomotive, which seems to be one extra wire, except that does there not have to be two wires running to each of these bulbs – in that case there is one wire short?  Does anyone know which wires are what so they can be connected correctly to an LM-3S correctly?
4)  Any idea if the light bulbs in this locomotive need to be replaced with 12V bulbs?
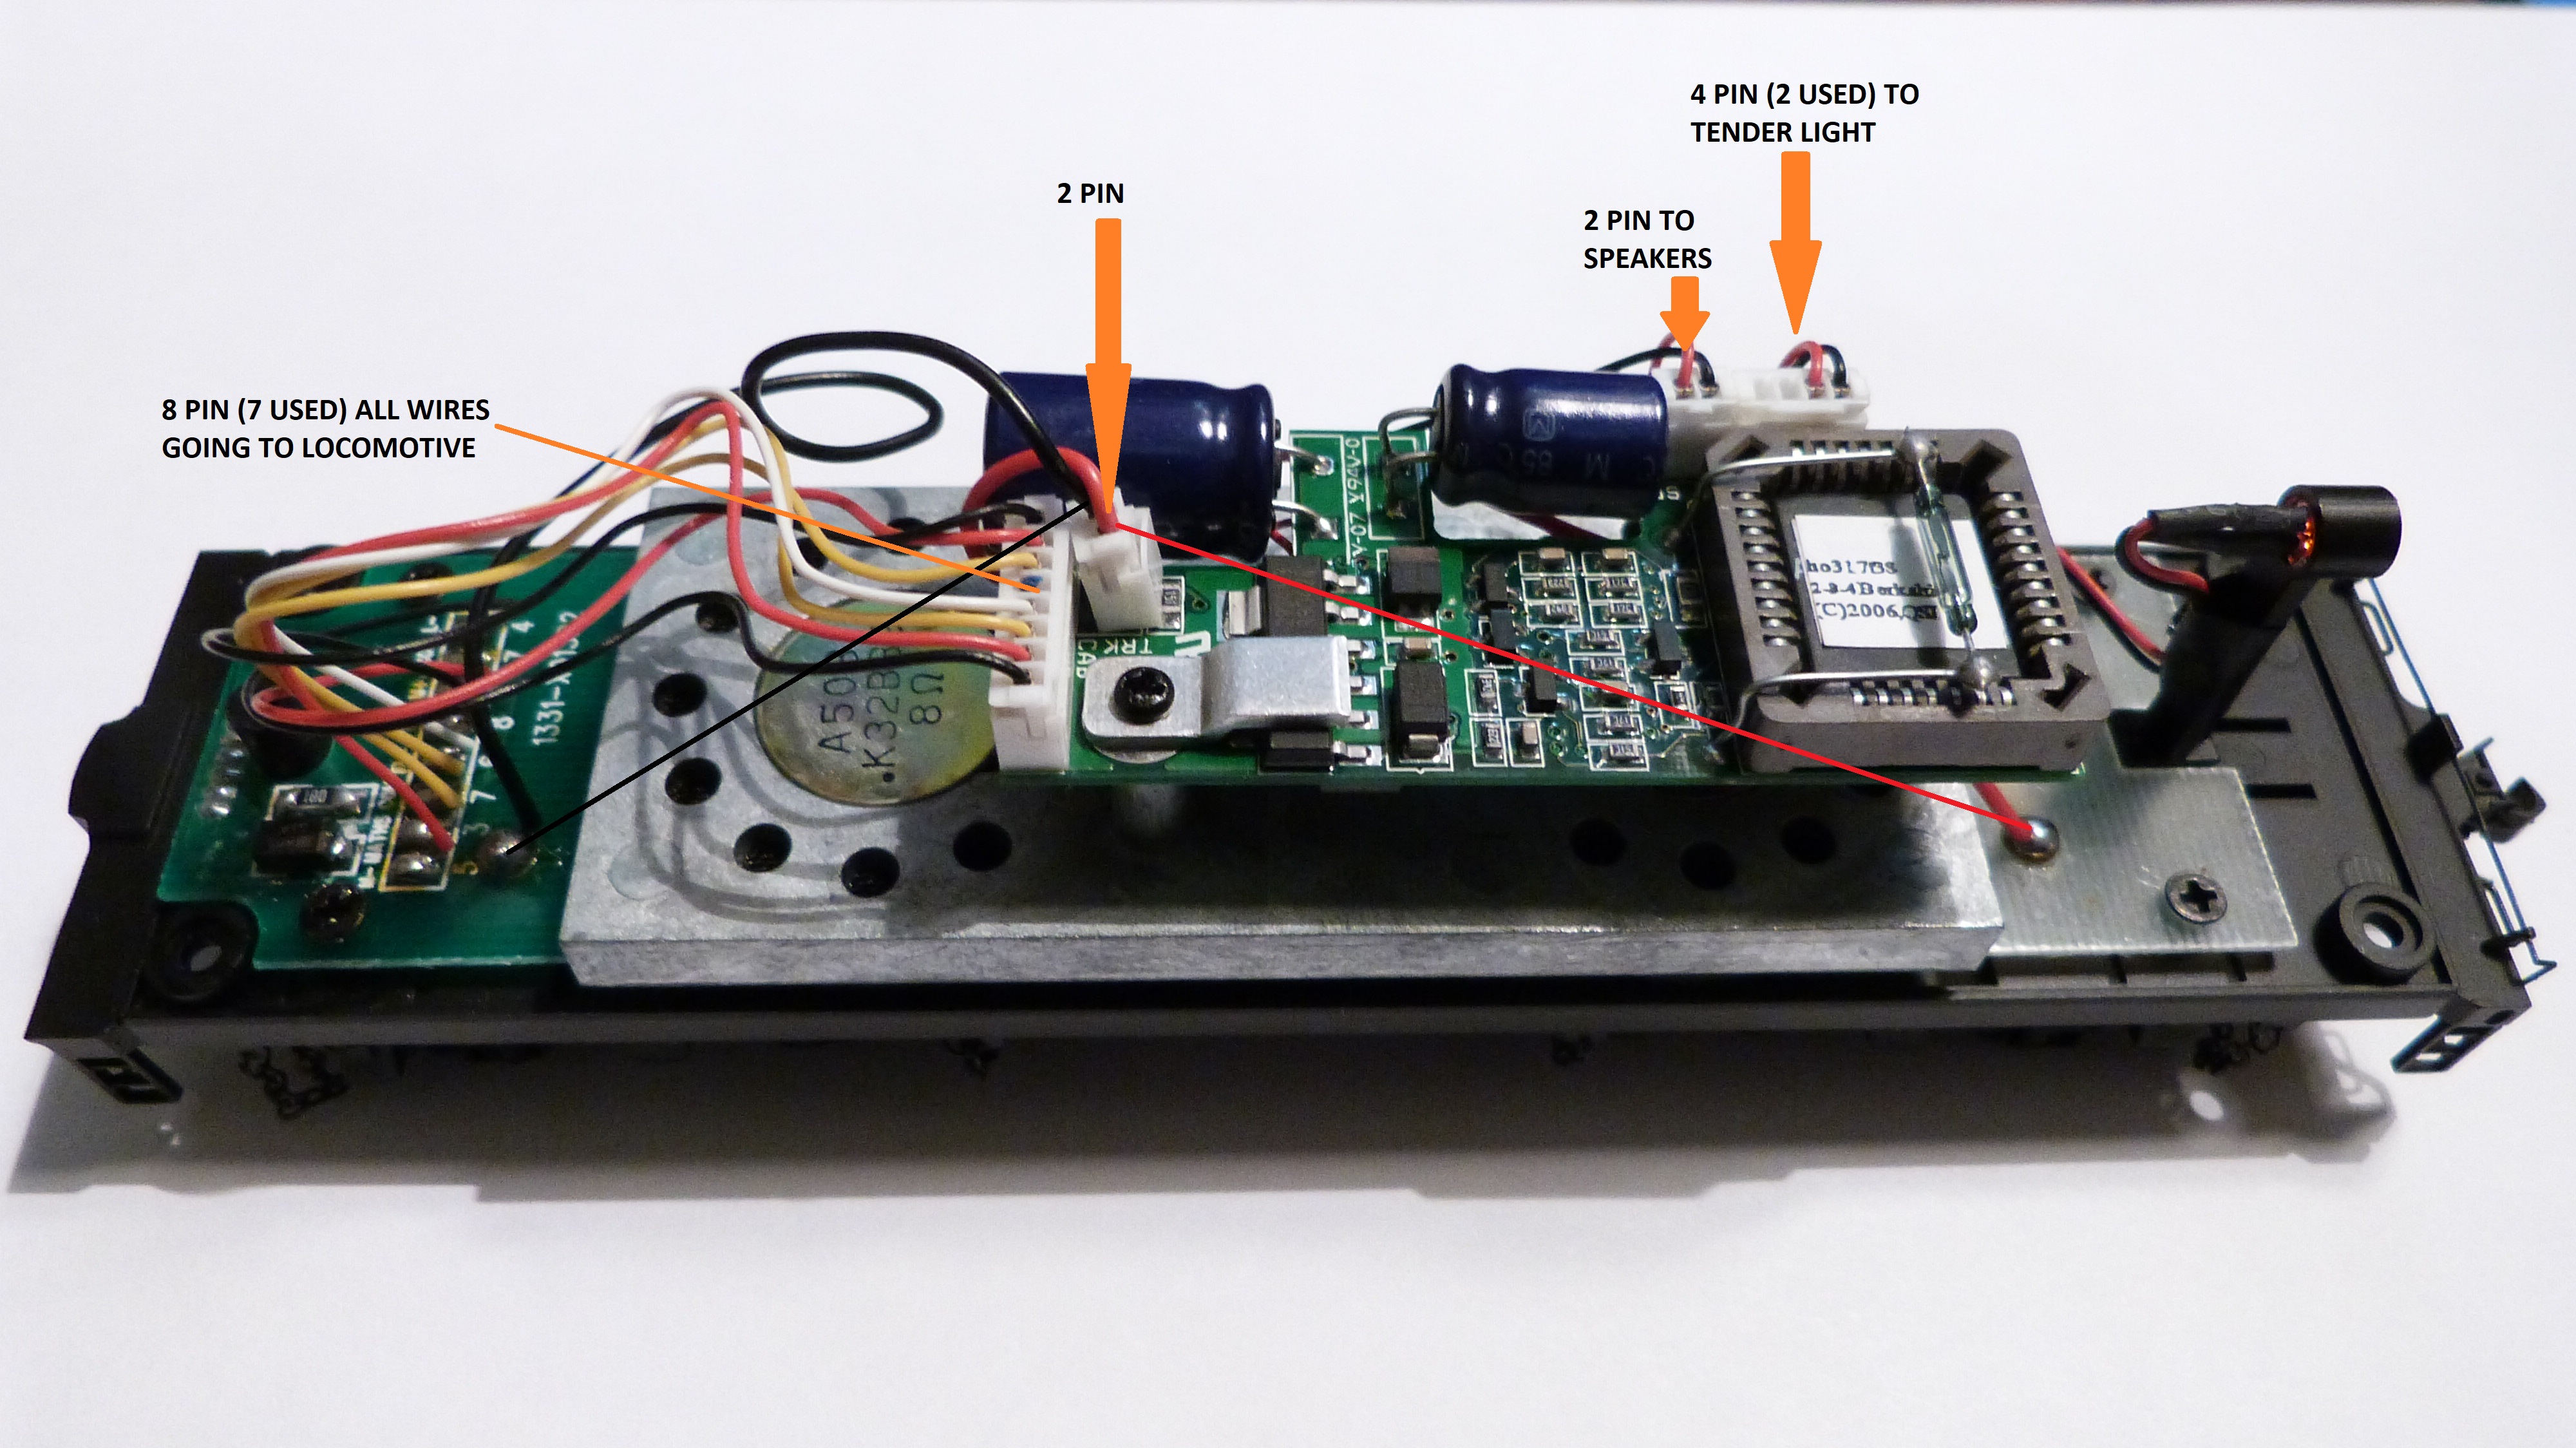
ProtoBerk.jpgAny comment even if not addressing all the questions will be appreciated.

nodcc4me

  • Conductor
  • ****
  • Posts: 690
  • RailPro Fan
Re: INSTALLING LM-3S in PROTO 2-000
« Reply #1 on: January 10, 2021, 10:59:15 AM »
I'm not familiar with the Quantum system, and I'm not sure the LM-3s is compatible with the existing boards. If the locomotive has both a headlight and a separate Mars light then I believe the yellow wires would go to those bulbs and the white wire would go to the tender light. I have found that in most cases it is just easier to remove the existing board and hard wire the module.
Al

Run your train, not your brain. Get RailPro. It's a no-brainer.

G8B4Life

  • Signalman (Global Mod)
  • Conductor
  • *****
  • Posts: 1257
  • I'll think of a catchy tag line one day
Re: INSTALLING LM-3S in PROTO 2-000
« Reply #2 on: January 11, 2021, 05:41:25 AM »
Are there 2, 4 and 8 pin receptacles that can be attached from which to run the wires to an LM-3S?

Without knowing exactly which JST series is used on the quantum board I'm going to go out on a limb and say no. As far as I know all the JST connectors that look like what's in your picture are wire-to-board connectors (plug with wires, socket on a circuit board). There are no sockets with wires that I know of.

The only way to keep the existing wiring and plugs in that case would be to make your own motherboard with the correct JST sockets on it, to which you'd solder a standard 9 pin harness to in the correct spots etc.

Quote
2)  If you look at the picture there are 13 wires that need to be attached to an LM-3S.  The photo attached identifies all the wires.  I understand how the 2 going to the speakers will attach, but that leaves 11 wires to attach to a 9 pin LM-3S.  Which 2 are not needed, or where do they get attached to the LM-3S, the 6 pin side?

You have to trace out which wire does what on the model. On the board that the 8 pin connector is on there are letters above (and numbers below) where the 8 pin connector wires are soldered onto the board. The letters might give you a clue.

It also appears that a blue wire has been cut off from the 8 pin connector. I wonder why?

Quote
3)  The locomotive has a MARS light.  There is one white wire and two yellow wires going to the locomotive, which seems to be one extra wire, except that does there not have to be two wires running to each of these bulbs – in that case there is one wire short?  Does anyone know which wires are what so they can be connected correctly to an LM-3S correctly?

Don't make the mistake of thinking that the wire colours on that board in any way complies with the NMRA wire colour standard, QSI or Life-Like (or whoever they are owned by now) would not be the first manufacturer to totally ignore it. My first guess is that the white wire is the common and the yellow wires are the switched outputs (one each for the headlight and MARS light). Again, that is a guess, you need to try and trace where they go.

Quote
4)  Any idea if the light bulbs in this locomotive need to be replaced with 12V bulbs?

Absolutely no idea on that one.

- Tim

Tom

  • Engineer
  • ***
  • Posts: 79
Re: INSTALLING LM-3S in PROTO 2-000
« Reply #3 on: January 11, 2021, 08:08:20 AM »
Tim,

Thank you for comments, always comprehensive as usual.  Looks like I have some plowing to do on this one.  I was hoping those connectors were somewhat common things, but have not been able to find on internet (except JST-2 pin) let alone confirm they are compatible.  Your comments about the letters close by the 8 pin connector may prove helpful.  Thanks again.

atsfguy

  • Conductor
  • ****
  • Posts: 112
Re: INSTALLING LM-3S in PROTO 2-000
« Reply #4 on: January 11, 2021, 10:51:54 AM »
Tom,
 Check micromark.com. They may have miniature connectors. I saw some on a site a few months ago but didn ‘t mark the site. I will do some digging and try to find it. If successful, I will PM you.
Cecil
Cecil
ATSF

atsfguy

  • Conductor
  • ****
  • Posts: 112
Re: INSTALLING LM-3S in PROTO 2-000
« Reply #5 on: January 11, 2021, 01:44:13 PM »
Tom,
 Micro Mark does have miniature connectors but they require soldering with a small iron. They come in strip form and you cut off the number of pins/ sockets that you need.
 I have never purchased these so other than everything I have bought at Micro Mark has been quality merchandise, I can’t say how good or easy to work with these are.
 I hope this helps you.

Cecil
Cecil
ATSF

G8B4Life

  • Signalman (Global Mod)
  • Conductor
  • *****
  • Posts: 1257
  • I'll think of a catchy tag line one day
Re: INSTALLING LM-3S in PROTO 2-000
« Reply #6 on: January 12, 2021, 07:36:12 AM »
I was hoping those connectors were somewhat common things, but have not been able to find on internet (except JST-2 pin) let alone confirm they are compatible.

They are actually more common than you'd think but you have to look in the right places, your not going to find them at the local electronics store for instance. The big electronic places like DigiKey, Farnell, element14 etc sell them, usually in packs of say 10, 50, 100 and so on.

To find out what you have you'll need to do some measuring and reading. It's likely to be either the SH (1.0mm pitch spacing) or ZH (1.5mm pitch spacing) series. JST (http://www.jst.com/home21.html) has spec sheets for everything so it shouldn't be hard to work out which connectors they are.

Once you've identified which connector it is there's a few of options (I though of an extra couple):

- If they are the 1.0mm pitch SH series then all you can really do is to make your own adapter motherboard (SH socket to ZH plug).

- If they are the 1.5mm pitch ZH series then you might be able to get the 9 pin plug and pop the connectors out of the 8 pin and insert them into the 9 pin (you'd have to reverse the procedure to put it back to original) or looking on JST's website I found this: http://www.jst-mfg.com/product/detail_e.php?series=289. This is a wire to socket connector series that will accept the ZH series plug. You could possibly make a custom socket to plug adapter harness however crimping the pins to the wires is "not a relaxing task" apparently.

- Tim

Alan

  • Conductor
  • ****
  • Posts: 1073
    • LK&O Railroad
Re: INSTALLING LM-3S in PROTO 2-000
« Reply #7 on: January 12, 2021, 09:05:07 AM »
As Tim says, the solution is in the JST catalog somewhere. Your mission is to find it.

What we mere mortals commonly call an adapter harness is known in the trade as wire-to-wire. Start your JST search there.

As last resort you can solder individual wires to the pins of a board receptacle (wire-to-board header) and cover each pin with heat shrink.
Alan

LK&O Railroad website

When I was a kid... no wait, I still do that. HO, 28x32, double deck, 1969, RailPro

faithie999

  • Conductor
  • ****
  • Posts: 166
Re: INSTALLING LM-3S in PROTO 2-000
« Reply #8 on: January 13, 2021, 06:53:04 AM »
Tom--
is it the 8-pin plug shown in your photo that you're trying to find?
if so, is it the same thickness and pin spacing as the 9-pin connector used on the LM's?

Tom

  • Engineer
  • ***
  • Posts: 79
Re: INSTALLING LM-3S in PROTO 2-000
« Reply #9 on: January 13, 2021, 09:10:56 AM »
Tim, Alan, faithie999,

Thank you for the comments, I will keep at it. 

I am trying to find 2, 4 and 8 pin adaptors, the ones that are on the decoder now, so I can wire them up to Ring WH-9 and WH-6 wiring harnesses.  I would then plug them into the other end of the 2, 4, and 8 pin plugs attached to the tender.  That way I do not destroy that wiring, and the decoder could easily be reinstalled.  I have not attempted to measure the pin pitch yet.

I had found the Digi-Key web site a few days ago and actually received a nice response from a sales rep.  It helped a little with some specifics like pitch that Tim mentioned that need to be figured out as well as two links.  Digi-Key’s products listing is beyond extensive.

Alan

  • Conductor
  • ****
  • Posts: 1073
    • LK&O Railroad
Re: INSTALLING LM-3S in PROTO 2-000
« Reply #10 on: January 13, 2021, 09:36:34 AM »
Digi-Key is a major US supplier. So is Mouser and several others. Still, I would suggest doing your search directly in the JST catalog. https://www.jst-mfg.com/product/category_pdf_e.php

Once you find your connector then shop the electronics suppliers. I made a short list of the popular suppliers on this post: https://rpug.pdc.ca/index.php?topic=727.0
Alan

LK&O Railroad website

When I was a kid... no wait, I still do that. HO, 28x32, double deck, 1969, RailPro

trainman605

  • Engineer
  • ***
  • Posts: 76
Re: INSTALLING LM-3S in PROTO 2-000
« Reply #11 on: January 13, 2021, 11:09:18 AM »
I purchased this Mini connector kit on Amazon, all thought it is pretty much over-kill and the crimper is just too big to use on these connectors I can use it elsewhere. I found that using a small pair of needle noise pliers works great for crimping and I do also solder the wires to the connectors, that's just what I like doing. Many smaller kits are on Amazon and they should work just fine, just find the one that works for you. I have also been a supplier for some of my RR buddies who just need a plug or two. https://www.amazon.com/Qibaok-Crimping-Ratcheting-Connectors-0-1-0-5mm%C2%B2/dp/B07ZK5F8HP/ref=sr_1_49_sspa?dchild=1&keywords=mini+connectors+2-10+pin+kit+with+crimper&qid=1610556884&sr=8-49-spons&psc=1&spLa=ZW5jcnlwdGVkUXVhbGlmaWVyPUEyWDZPTEtTTVlITTk2JmVuY3J5cHRlZElkPUEwNTA3ODgyN1I2Vkk4MlVBNFpWJmVuY3J5cHRlZEFkSWQ9QTA2MTc2NDUyTFA3SDVMTjFOVFFMJndpZGdldE5hbWU9c3BfYXRmX25leHQmYWN0aW9uPWNsaWNrUmVkaXJlY3QmZG9Ob3RMb2dDbGljaz10cnVl  One other thing you need to purchase on Amazon is wire, look for the 10 color assortment in the 5' range, size 20-22 size should work for all voltages in your G scale engines, the only exception might be the smoke unit.

trainman

Tom

  • Engineer
  • ***
  • Posts: 79
Re: INSTALLING LM-3S in PROTO 2-000
« Reply #12 on: January 27, 2021, 05:46:45 PM »
Some progress, and more questions, see attached second photo.  Photo does not show the two other two pin connectors, but I have them.  Since these are the male connectors, I do not need any crimping tool, but have to solder.

First question, can these even be soldered by a human?

Second question: There would be 7 wires from 8 pin connector and two wires running from each of the 4 pin and two 2 pin connectors, a total of 13, going to the Ring 6 pin and 9 pin connectors.  I think the Ring connectors are 30 GA, but the wires running to pickups on tender are bigger (see first photo).  Does that matter?

Third question, if we get this far: there are two different pin shapes (see photo) bent and straight except for the 8 pins which are both bent, but done so differently.  For either soldering, or putting together and then separating the connectors again, would one be better than the other?

Any comments will be appreciated, especially before I buy any pointy tipped soldering iron and throw more money away on this.  The whole idea is to preserve the original wiring connections to make the reinstallation of the original decoder simple.  Once set up, though, it might make installation or swapping out of the LM easier too.  Right now I have an LM-2S available.

nodcc4me

  • Conductor
  • ****
  • Posts: 690
  • RailPro Fan
Re: INSTALLING LM-3S in PROTO 2-000
« Reply #13 on: January 27, 2021, 07:01:51 PM »
Those are fine wires, but they can be soldered. Slip heat shrink sleeves onto the wires before soldering. I use a small amount of flux to keep the connection as small as possible. After soldering, slip the shrink tubes down over the connection and heat them carefully until they tighten down.


The wire size shouldn’t  matter. I think they use very thin wire to the trucks for more flexibility but they are not the easiest to work with.


The direction of the pins isn’t crucial and you may find that soldering them and keeping them from contacting one another may be easier if you bend every other pin.


Invest in a small soldering iron. It will get plenty of use. I use a fairly old Wahl that takes multiple tips and is rechargeable. Other guys may have different preferences.
Al

Run your train, not your brain. Get RailPro. It's a no-brainer.

Alan

  • Conductor
  • ****
  • Posts: 1073
    • LK&O Railroad
Alan

LK&O Railroad website

When I was a kid... no wait, I still do that. HO, 28x32, double deck, 1969, RailPro